It is possible for the digital temperature reading to be inaccurate to the true physical temperature of the heating element.
An infrared thermometer can be used to check and test the true temperature reading of a heat press.
Industry standards allow for around a 5% variation between digital and physical temperatures.
This can however be more. In these instances the heat press control module can be simply recalibrated to fix the error.
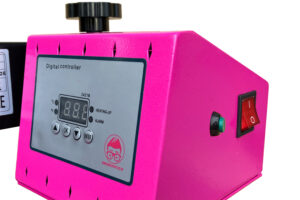
- Turn the power on using the red switch on the side of the digital control module
- Press and hold the OK button for around 5-7 seconds
- P3 will appear
- Press the OK button again
- P4 will appear – this is the recalibration area
- The digital display will read ‘0’ / ‘Zero’
- To recalibrate press the UP or DOWN arrows to adjust the digital temperature reading
- When the desired adjustment has been made press the OK button to save the temperature adjustment
When recalibrating the digital temperature reading the UP and DOWN arrows are used to change the digital reading from ‘0’
Example:
Digital temperature display reading – 180 Celsius
Physical temperature – 170 Celsius
Press the DOWN arrow until the digital display reads -10 (minus / negative 10). This will lower the digital reading by 10 degrees. The heat press will then increase heat to compensate to give a true temperature of 180 Celsius.
Digital temperature display reading – 180 Celsius
Physical temperature – 190 Celsius
Press the UP arrow until the digital display reads +10 (plus / positive 10). This will increase the digital reading by 10 degrees. The heat press will then decrease heat to compensate to give a true temperature of 180 Celsius.